Secrets Of Switch Mode Power Supply Repair And Troubleshooting
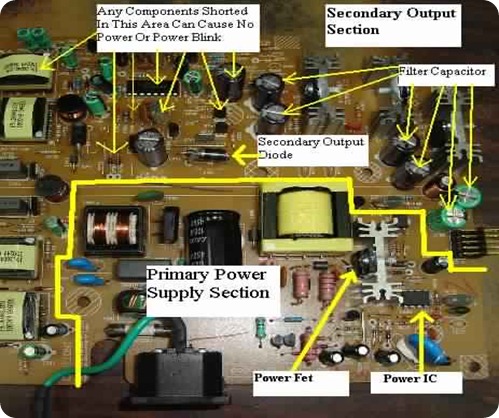
SMPS repair sometimes can be easy and sometimes are quite difficult to solve the problem. The power supply fault could be an open start up resistor only or could be even more than ten components burnt due to heavy lightning strike. In this article, I’m going to explain to you the power supply problems that caused by defective components at secondary side. Sometimes no power, power blink and low output power symptoms are due to problems in the main circuit board. It is not necessary the fault must be in the primary power section and shorted secondary output diodes.
The fault can be further down the secondary output lines which are in the main board. If you had measured all the components in the power supply section and could not find the defective component, then try troubleshoot components beyond the power supply section. A shorted small ceramic capacitor in the main board can cause the whole power supply to malfunction.

A Switch Mode Power Supply
All SMPS has outputs at the secondary section. Some designed have four outputs, some have five and so on. Each of the output is connected to an individual circuit. For instance, a 6.3 volt output supply is send to the picture tube so that it could light up and heat the cathode gun. A 5 volt supply will usually entered into microprocessor and EEPROM IC as vcc supply, 60-100 volt to B+ pin of flyback transformers and so forth. If one of the components or circuit developed a short circuit, the voltage (vcc supply) line will drawn a lot of current and thus the power will shut down, fluctuate, low output power or even no power at all. You must know how to isolate or repairs the problem otherwise you will be wasting your time troubleshooting good components in the power supply section.
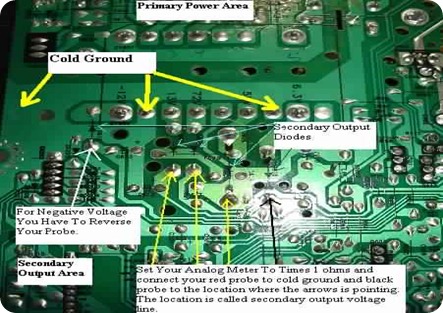
Set your analog meter to times 1 ohm range and check all the secondary output (after diodes) between of ground and all the output voltage line. Put your red probe to the cold ground and the black probe to each of the outputs of secondary diodes. It should measured only one reading and sometimes the pointer will kick up a little bit. This is a normal reading for a good output voltage line. This happened due to the main board resistance and some undischarged voltage from the secondary output filter capacitor.
If you are checking the negative output then you have to reverse the meter’s probe. If any output voltage lines showed two same reading (low ohms readout), then suspect that there is problem in that output line. Carefully follow the suspected output voltage line and gently remove components one by one at a time to isolate the short circuit. From my experienced it is usually caused by a shorted IC, a transistor, a diode or even a resin type ceramic capacitor. If you repair Monitor SMPS, if one of the output voltage lines shows two readings, please do not think that the lines is having a problem. The real caused as to why do you get two readings are due to that you are checking the filament (heater) circuit. The line goes to the picture tube’s filament and direct to cold ground, that’s why you have two readings. Please don’t set your analog meter to times 10 Kilo ohm otherwise all the reading that you measured will show two readings which is not accurate.

The Back Portion Of A Switch Mode Power Supply Section
True case study- A Samtron Monitor 4Bn sent for repair with the complaint of no power. After troubleshooting the SMPS section for sometime, I’ve concluded that the power supply is working and suspect something shorted after the secondary output diodes and this made me to trace beyond the power supply unit. By using the explanation above, I managed to traced and found a shorted small resin ceramic capacitor located at the 80 volt line in the Monitor color board. The capacitor shorted to ground and made the power supply to stop operating.
The value of the shorted capacitor was .22 microfarad 100 volt. Replacing only the small capacitor brought the power supply back to life again. In SMPS repair, we as an electronic repairer must know how to distinguish as which section is giving problem. Spending and concentrating your whole time to check on a working section is just a waste of time, you should only concentrate on section that have problems so that you could locate the fault and make the equipment work again. That’s all for today, hope you enjoy the article. Keep an eye on your email for more repair techniques that I’m going to share to you in the next days.


